Low water pressure in a motorhome is one of the most common and frustrating problems RV owners face. You turn on the tap and get a trickle instead of a proper flow. The shower feels weak. The toilet takes forever to fill. It ruins the comfort of life on the road.
However, before you spend money on a new pump, there is good news. In most cases, low pressure is caused by something simple that you can fix yourself. Therefore, this guide will walk you through every likely cause and show you how to restore full pressure without replacing your water pump.
Understanding How a Motorhome Water Pump Works
Before you start diagnosing the problem, it helps to understand the basics. A motorhome water pump is a 12-volt demand pump. It sits between your fresh water tank and the rest of your water system. When you open a tap, the pump detects a drop in pressure and switches on. It pushes water through the pipes until the pressure builds back up, then it switches off.
This cycle happens many times a day. Over time, wear, debris, and air can all interfere with the pump’s ability to maintain consistent pressure. However, the pump itself is often not the root cause. The problem is usually somewhere else in the system. Therefore, working through the system step by step is always more effective than jumping straight to a replacement.
Common Causes of Low Water Pressure in a Motorhome
Low pressure can come from several different sources. Knowing the most common causes helps you work through them efficiently. Here are the main culprits to investigate:
- A clogged or dirty inlet strainer on the pump
- A partially closed or faulty valve somewhere in the system
- Air trapped in the water lines
- A worn or stiff diaphragm inside the pump
- A loose or leaking connection causing pressure loss
- Low voltage reaching the pump
- A blocked or kinked water line
- A failing pressure switch inside the pump
Additionally, a low water level in the fresh water tank can cause the pump to draw air instead of water. This leads to weak, inconsistent pressure that many owners mistake for a pump fault. Therefore, always check the tank level first before doing anything else.
Step One: Check the Fresh Water Tank and Supply
This sounds obvious, but it is often overlooked. A half-empty tank can create air pockets that disrupt water flow. Fill the tank completely and run the pump again to see if the pressure improves.
Additionally, check the tank outlet fitting. This is the point where water leaves the tank and enters the pump inlet line. If this fitting is partially blocked by sediment or debris, flow to the pump will be restricted. A restricted supply means the pump cannot draw enough water to build proper pressure, no matter how well it is working.
Therefore, if the tank is full but pressure is still low, move on to the next step. The supply line and connections are the next logical place to look.
Step Two: Inspect and Clean the Pump Inlet Strainer
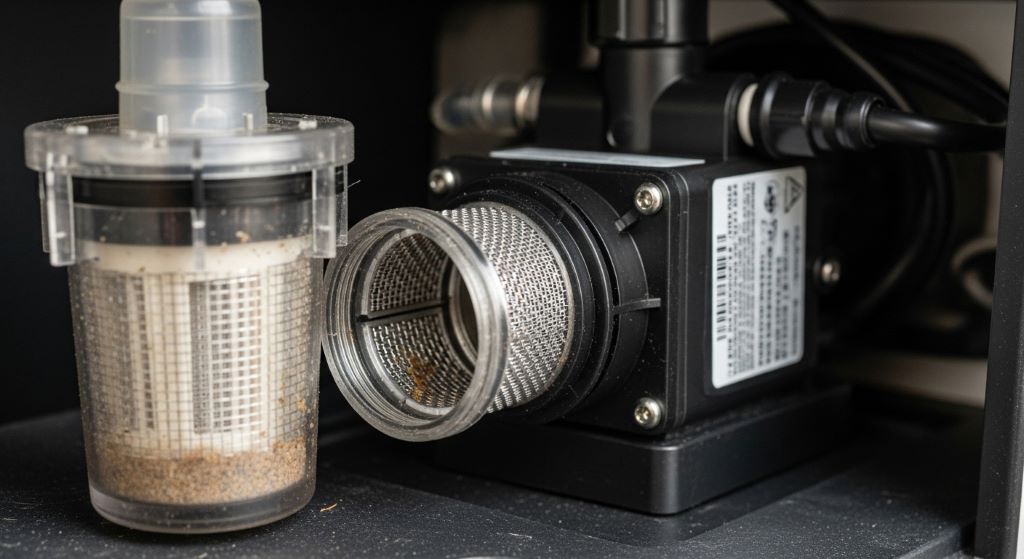
Every motorhome water pump has a small strainer or filter screen built into its inlet port. This screen catches debris before it enters the pump mechanism. Over time, it collects grit, sediment, and mineral buildup. A clogged strainer is one of the most common causes of reduced pressure and one of the easiest to fix.
To access the strainer, locate your pump. It is usually found under a seat, in a storage bay, or beneath the kitchen area. Turn off the pump and the water supply before you begin. Place a towel under the pump to catch any water.
Disconnect the inlet hose from the pump. You will see a small mesh screen inside the port. Remove it carefully using needle-nose pliers or a small screwdriver. Rinse it thoroughly under running water. If it is heavily scaled or clogged, soak it in white vinegar for 15 to 20 minutes, then rinse again. Refit the screen, reconnect the hose, and test the pump.
In many cases, this one step is all it takes to restore full pressure. However, if cleaning the strainer does not solve the problem, continue working through the rest of the system.
Step Three: Check All Valves and Inline Filters
Motorhomes often have multiple shut-off valves throughout the water system. These include valves at the tank outlet, at the pump inlet, and sometimes at individual fixtures. If any of these valves is only partially open, it will restrict flow and reduce pressure throughout the system.
Walk through your motorhome and check every valve you can find. Make sure each one is fully open. Additionally, look for any inline water filters fitted between the tank and the pump. These filters trap sediment and protect the pump, but they also need regular cleaning or replacement.
A clogged inline filter acts like a blocked artery. Water struggles to flow through it properly. Therefore, if you find a filter that has not been serviced in a while, clean or replace the cartridge before moving on. This is a quick and inexpensive fix that is frequently overlooked.
Step Four: Bleed Air from the Water Lines
Air trapped in your water lines is a very common cause of low or pulsing pressure. It often gets in after the tank runs dry, after winterizing, or after any work on the water system. Air pockets interrupt the steady flow of water and cause the pump to work harder than it should.
Bleeding air from the lines is straightforward. Turn the pump on and open every tap in the motorhome, one at a time. Start with the tap farthest from the pump and work your way closer. Let each tap run until the flow becomes steady and smooth. You may hear gurgling or spluttering as the air escapes. This is completely normal.
Additionally, do not forget the outdoor shower, the toilet, and the water heater bypass if your system has one. Air can hide in any branch of the system. Therefore, be thorough and run every outlet until the flow is consistent. Once all the air is cleared, pressure usually improves noticeably.
Step Five: Inspect the Pump for Internal Wear
Checking the Diaphragm
Inside most 12-volt RV water pumps is a flexible diaphragm that moves back and forth to create the pumping action. Over time and with heavy use, this diaphragm can stiffen, crack, or develop small tears. A damaged diaphragm reduces the pump’s ability to draw water and build pressure.
The good news is that diaphragms are replaceable. Most pump manufacturers sell repair kits that include new diaphragms, valves, and O-rings. These kits cost a fraction of a new pump. To access the diaphragm, you will need to remove the pump’s head screws and open the pump body. This takes about 20 to 30 minutes and requires only basic tools.
Once the pump is open, inspect the diaphragm carefully. If it looks cracked, stiff, or deformed, replace it. Additionally, check the small check valves inside the pump. These are small rubber flaps that control the direction of water flow. If they are worn or stuck, they will also reduce pressure. Replace any that look damaged while you have the pump open.
Inspecting the Pressure Switch
The pressure switch tells the pump when to turn on and when to turn off. If the switch is faulty, it may shut the pump off too early, before full pressure is reached. This leads to low, inconsistent pressure that varies each time you use a tap.
Some pressure switches are adjustable. If yours has a small adjustment screw, try turning it slightly to increase the cut-off pressure. However, do this carefully and in small increments. Over-adjusting can cause the pump to run continuously, which will wear it out quickly.
Additionally, check that the pressure switch connections are clean and tight. Corroded terminals can cause the switch to behave erratically. Clean any corrosion with a wire brush and apply a small amount of contact cleaner to ensure a solid electrical connection.
Step Six: Test the Electrical Supply to the Pump
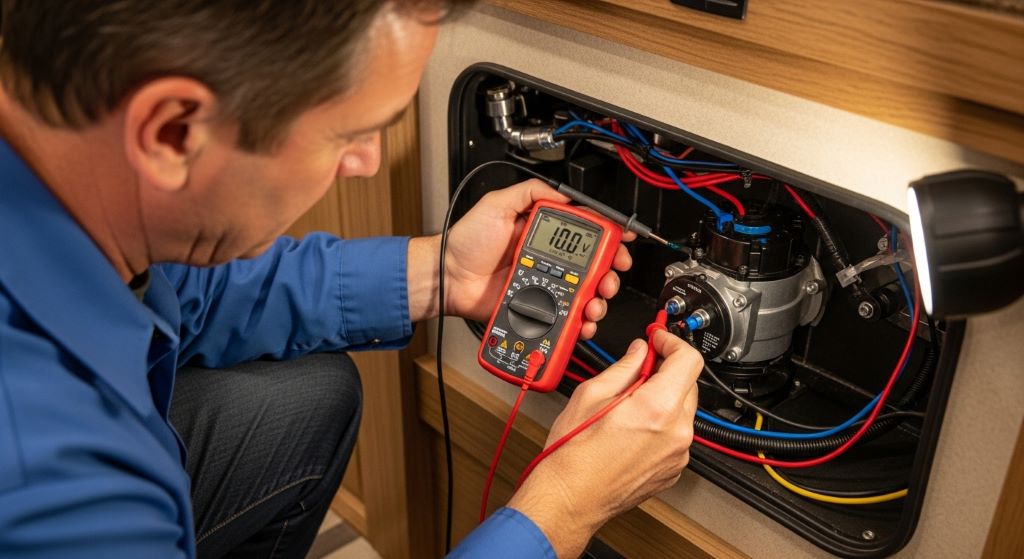
A motorhome water pump runs on 12-volt DC power from the leisure battery. If the battery is low or the wiring has a fault, the pump will not receive enough power to run at full speed. A pump running on low voltage produces noticeably reduced pressure.
Use a multimeter to check the voltage at the pump terminals while it is running. You should see a reading of at least 12 volts. If the reading drops below 11 volts during operation, the pump is being starved of power. Therefore, check the battery state, the fuse, and the wiring between the battery and the pump.
Look for any loose connections, corroded terminals, or damaged wiring along the supply route. Even a small voltage drop caused by a poor connection can have a big impact on pump performance. Additionally, ensure the fuse in the pump circuit is the correct rating. An undersized fuse can cause intermittent power issues that are easy to miss.
Step Seven: Check for Leaks in the Water Lines
A leak anywhere in the water system will cause pressure to drop. Even a small drip behind a panel or under a floor can bleed pressure away from your taps. Therefore, it is worth doing a careful visual inspection of all accessible pipework in the motorhome.
Turn the pump on and leave all taps closed. Listen for the pump cycling on and off repeatedly. If the pump keeps switching on every few seconds without any taps open, you almost certainly have a leak somewhere. The pump is working to maintain pressure that is quietly escaping through a crack or loose fitting.
Check push-fit connectors first. These are very common in modern motorhomes and can sometimes work loose over time, especially after the vehicle has been through vibration on rough roads. Pressing each fitting firmly back into place or replacing a worn clip is often all that is needed. Additionally, inspect flexible hose sections for any signs of cracking or perishing, particularly near joints and elbows.
When to Consider a Professional Check
If you have worked through all of the steps above and the pressure is still low, it may be time to get a professional opinion. Some internal pump faults, such as a worn impeller or a damaged pump housing, are difficult to diagnose and repair without specialist knowledge.
However, even at this stage, a technician may be able to rebuild the pump rather than replace it. Rebuild kits for popular pump brands such as Shurflo and Flojet are widely available. An experienced technician can often overhaul a pump in under an hour at a cost well below that of a new unit.
Therefore, always ask about repair options before agreeing to a full replacement. A motorhome water pump that is properly serviced and rebuilt can perform as well as a new one, often for a fraction of the price.
Conclusion
Low water pressure in a motorhome is annoying, but it is rarely a reason to buy a new pump. In most cases, the cause is something simple and fixable. A clogged inlet strainer, a dirty filter, trapped air, a worn diaphragm, a loose connection, or a low battery can all reduce pressure significantly.
By working through each step in order, you can identify the problem methodically and fix it without guesswork. Start with the easiest checks first. Clean the strainer, inspect the valves and filters, bleed the air, and check the electrical supply. Additionally, do not overlook leaks. A slow drip hidden behind a panel can cause just as much pressure loss as a failing pump.
Therefore, before spending money on a replacement, give your existing pump a thorough service. With a small investment of time and a basic repair kit, you can restore full pressure and get back to enjoying life on the road.
Frequently Asked Questions
1. Why does my motorhome water pump run but produce low pressure?
This is usually caused by a clogged inlet strainer, a worn diaphragm, or trapped air in the lines. The pump is working, but something is preventing it from drawing or pushing water efficiently. Start by cleaning the inlet strainer and bleeding air from the system. If pressure is still low, inspect the diaphragm and check valves inside the pump for wear.
2. How do I know if my motorhome water pump diaphragm needs replacing?
Signs of a worn diaphragm include reduced pressure, a pump that pulses unevenly, or a pump that runs continuously without building pressure. To confirm, open the pump body and inspect the diaphragm directly. If it appears cracked, stiff, or misshapen, replace it using a manufacturer-approved repair kit. This is a straightforward repair that most owners can do themselves.
3. Can low battery voltage cause low water pressure in a motorhome?
Yes, it can. A 12-volt water pump needs adequate voltage to run at its rated speed. If the leisure battery is partially discharged or if there is a wiring fault causing a voltage drop, the pump will run slower and produce less pressure. Use a multimeter to check the voltage at the pump terminals while it is running. A reading below 12 volts indicates a power supply problem.
4. How often should I clean the water pump strainer in my motorhome?
It is a good idea to check and clean the pump inlet strainer at least once a season, or more frequently if you use the motorhome regularly. If you fill your tank from different sources, including non-mains supplies, debris can build up more quickly. A quick clean takes only a few minutes and can prevent a significant drop in performance over time.
5. Is it worth repairing a motorhome water pump instead of replacing it?
In most cases, yes. Repair kits for popular brands are inexpensive and widely available. A new diaphragm, a set of check valves, and fresh O-rings can restore a pump to near-new performance at a fraction of the cost of a replacement. However, if the pump housing is cracked or the motor itself has failed, replacement becomes the more practical option. Always assess the condition of the pump before deciding.
Related Topics:
Essential Motorhome Repairs And Maintenance Guide
How to Properly Wash and Wax Car for a Lasting Shine